Creating ROS 2 Services
 José L. Millán ·
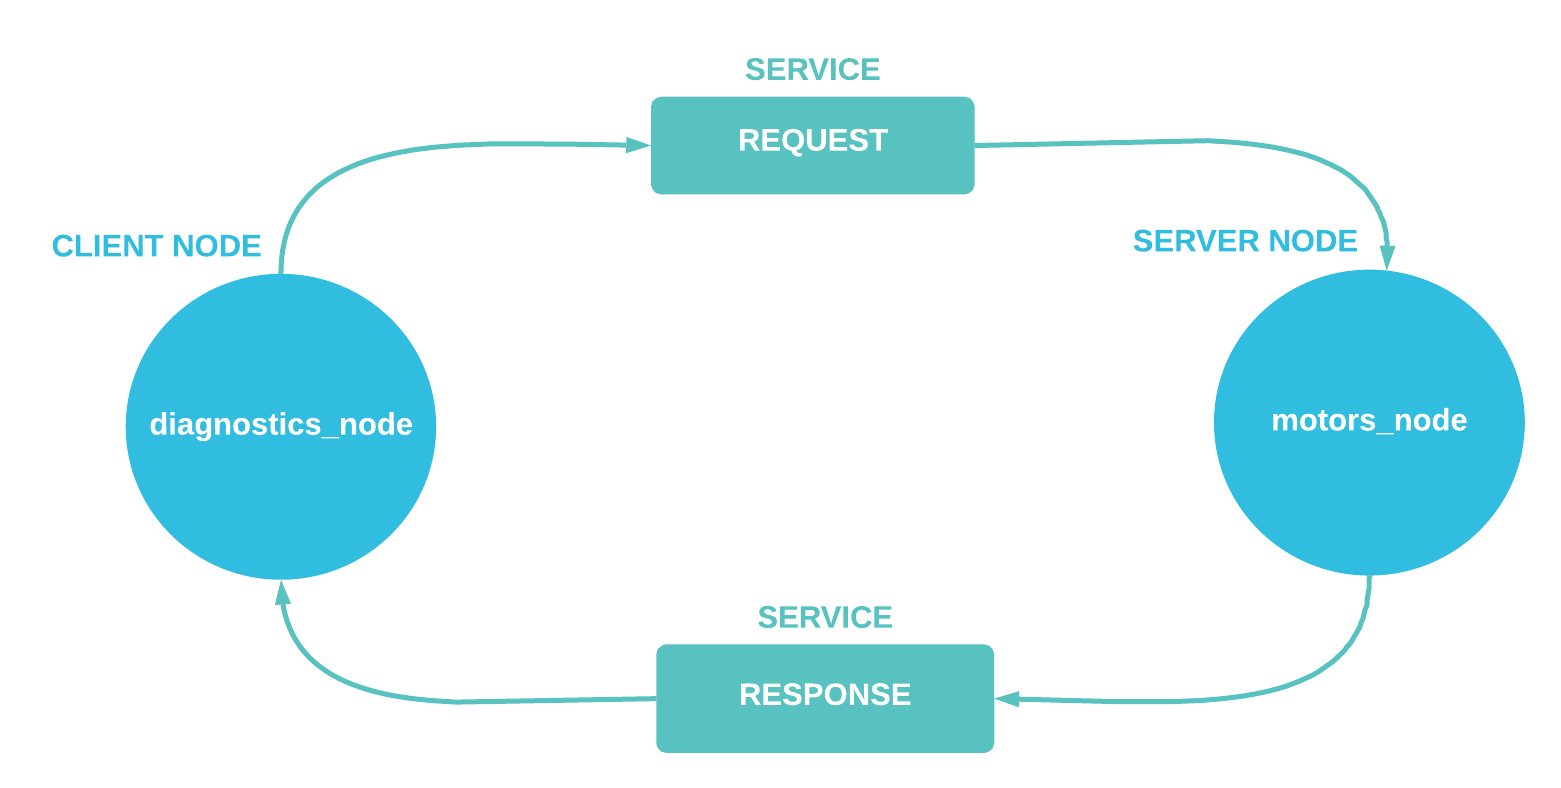
In our previous ROS 2 basics tutorial, we covered how ROS nodes communicate with each other by publishing and subscribing to message streams on topics.
Another common way nodes can share information with each other is via services. With ROS 2 services, one or many "client" nodes can make requests to a "server" node and wait for its response. These make services great for performing on-demand tasks – like performing on-the-fly computations or simple one-time tasks.
In this tutorial, we'll learn how to build a client and server node in C++, and implement a service for them to pass data to each other.
How do services work?
Unlike topics, which follow a publish-subscribe model to send each other information, services follow a request-response model.
With services, a client node must first call the server in order to send a request. This means that in the server-client mode, nodes do not use a communication stream until it’s absolutely needed, preventing unnecessary bandwidth usage. Then, the client node must wait for a response from the server (or until a timeout is reached). For this reason, services can confirm communication between nodes.
Services consist of two parts - a request and a response. Each part can be empty or contain as many data fields that you want to share between nodes.
To define a service, you must create a .srv file in your ROS 2 package’s srv directory that contains both those components:
# Request
---
# Response
Let’s start by exploring three different service definitions in the std_srvs package:
Empty.srv– Empty request and response. The only data that is passed from client to server is the call itself.Trigger.srv– Empty request and a response withsuccessandmessagefields. This allows the server to send more information to the client.SetBool.srv– Request withdatafield and response withsuccessandmessagefields.
The more fields a service contains, the more information the client and server can exchange with each other.
When should I use services?
Let’s suppose you want to create a routine check for your robot – for example, you may want to verify at start-up that your robot's servo motors are all working properly.
If you were to create a publisher for this task, your node could publish its check results before a corresponding subscriber becomes available. As a result, you'd miss the check results and be left in the dark about the status of your motors.
But if you were to create a service instead, your server node wouldn't broadcast any data before it is explicitly requested by a client node. Using a service ensures that you do not miss crucial information due to inopportune timing.
In the service scenario, the client node could be a diagnostics node that gathers robot state data at start-up. The server node could be a motor node that controls the robot’s servo motors. If all goes well, and the actuators are working properly, the server node would deliver a response saying that all checks passed. If any motors encountered an issue, however, the response would raise an alarm.
The client will wait for a response within a specified timeout period.
A ROS 2 service in action
Now that we’ve discussed how when you might use ROS services, let’s dive into some actual code.
Let's use the Trigger.srv we saw before. Remember that this service definition contains no field in the request. The client is not sending any data to the server when it makes this request - it is just a trigger. The server, however, will respond with success and message fields.
We’ll begin by creating our own ROS 2 package. Navigate to the src folder of your ros2_ws and create a package named srv_client_checks:
$ cd ros2_ws/src/
$ ros2 pkg create srv_client_checks --dependencies rclcpp std_srvs
Writing a server node
Let's start out with our server motor_node, which will run the necessary check on the servo motors.
Go to the src folder of your new package and create a file named motor_node.cpp:
// Include the rclcpp library and trigger service type
#include "rclcpp/rclcpp.hpp"
#include "std_srvs/srv/trigger.hpp"
Define two functions: moveMotorToMinAndMax and doChecks.
moveMotorToMinAndMax will simulate the motors moving to their maximum and minimum positions. If the motor successfully reaches both limits, the function will return true; otherwise, it will return false.
bool moveMotorToMinAndMax(int motor_id){
  bool reached_min = false;
  bool reached_max = false;

  // Add code here that moves the motor to its min and max positions

  if (reached_min && reached_max){
    return true;
  } else {
    return false;
  }
}
The doChecks server callback receives two inputs (a request and response) and will run when the server is activated by a client. It iterates over all available motors to perform the moveMotorToMinAndMax check on each one, then sends back a response:
// DDS helps pass the request and response between client and server
void doChecks(const std::shared_ptr<std_srvs::srv::Trigger::Request> request, std::shared_ptr<std_srvs::srv::Trigger::Response> response){

  // Prepare response
  response->success = true;
  response->message = "";
  RCLCPP_INFO(rclcpp::get_logger("rclcpp"), "Received request to check motors...");

  // Iterate over all motors (e.g. 5) to perform the check
  for (int i = 0; i < 5; i++) {
    RCLCPP_INFO(rclcpp::get_logger("rclcpp"), "Checking motor %i",i);
    auto res = moveMotorToMinAndMax(i);
    // If something fails, change response `success` to false and add info to the `message`
    if (!res) {
      response->success = false;
      response->message += "Motor"+std::to_string(i)+" Failed";
    }
  }

  RCLCPP_INFO(rclcpp::get_logger("rclcpp"), "Sending back response...");
}
Finally, we create a main function as our entrypoint:
int main(int argc, char **argv) {
  // Initiate the rclcpp library
  rclcpp::init(argc, argv);

  // Create a shared pointer to a Node type and name it "motor_node"
  std::shared_ptr<rclcpp::Node> node=rclcpp::Node::make_shared("motor_node");

  // Create the "checks" service with a doChecks callback
  rclcpp::Service<std_srvs::srv::Trigger>::SharedPtr service =
    node->create_service<std_srvs::srv::Trigger>("checks", &doChecks);

  RCLCPP_INFO(rclcpp::get_logger("rclcpp"), "Ready to check motors");

  // Spin the node until it's terminated
  rclcpp::spin(node);
  rclcpp::shutdown();
}
Writing a client node
Now that we have a server node, let's move on to the client node that will request a response from it.
Create a diagnostics_node.cpp file in your package's src folder, and include the following libraries:
#include "rclcpp/rclcpp.hpp"
#include "std_srvs/srv/trigger.hpp"
// C++ namespace for representing time durations
using namespace std::chrono_literals;
Let's start with our main function:
int main(int argc, char **argv) {
  // Initiate the rclcpp library
  rclcpp::init(argc, argv);

  // Create a shared pointer to node and name it "diagnostics_node"
  std::shared_ptr<rclcpp::Node> node=rclcpp::Node::make_shared("diagnostics_node");

  // Create client inside the node to call our "checks" server node
  rclcpp::Client<std_srvs::srv::Trigger>::SharedPtr client =
    node->create_client<std_srvs::srv::Trigger>("checks");
Next, let’s create a request that the client can send to the server using the Trigger.srv service:
  // Create the request, which is empty
  auto request = std::make_shared<std_srvs::srv::Trigger::Request>();
Before we send the request, let's make sure the server is active – otherwise, our request will be lost. The function wait_for_service() requires a timeout, which is the maximum time a client will wait for a response.
  // Wait for the service to be activated
  while (!client->wait_for_service(1s)) {
    // If ROS is shutdown before the service is activated, show this error
    if (!rclcpp::ok()) {
      RCLCPP_ERROR(rclcpp::get_logger("rclcpp"), "Interrupted while waiting for the service. Exiting.");
      return 0;
    }
    // Print in the screen some information so the user knows what is happening
    RCLCPP_INFO(rclcpp::get_logger("rclcpp"), "service not available, waiting again...");
  }
Once the server is on, the program will exit the while loop, send the request, and spin the node until the future is complete (i.e. the client receives a response from the server).
If spin_until_future_complete returns a SUCCESS, we know that the server has responded correctly, and we can process that response. If the return value is not SUCCESS, we can assume there was a problem with reaching the server:
  // Client sends its asynchronous request
  auto result = client->async_send_request(request);
  // Wait for the result
  if (rclcpp::spin_until_future_complete(node, result) == rclcpp::FutureReturnCode::SUCCESS) {
    // Get the response's success field to see if all checks passed
    if (result.get()->success) {
      RCLCPP_INFO(rclcpp::get_logger("rclcpp"), "The checks were successful!");
    } else {
      RCLCPP_WARN(rclcpp::get_logger("rclcpp"), "The checks were not successful: %s", result.get()->message.c_str());
    }
  } else {
    RCLCPP_ERROR(rclcpp::get_logger("rclcpp"), "Failed to call service 'checks'");
  }

  // Shut down rclcpp and client node
  rclcpp::shutdown();
  return 0;
}
Compiling the package
Add the executables to your compilation file, and install them in your path, so that the ros2 run command can find them.
In the CMakeList.txt file, make sure that you've the following:
# Tell compiler that we require the rclcpp and std_srvs packages
find_package(rclcpp REQUIRED)
find_package(std_srvs REQUIRED)

# Add the nodes as executables with their dependencies
add_executable(motor_node src/motor_node.cpp)
ament_target_dependencies(motor_node
    rclcpp std_srvs)
add_executable(diagnostics_node src/diagnostics_node.cpp)
ament_target_dependencies(diagnostics_node
    rclcpp std_srvs)

# Install the executables so 'ros2 run' can find them
install(TARGETS
    motor_node
    diagnostics_node
    DESTINATION lib/${PROJECT_NAME})
Return to the root folder of your workspace to compile with your new nodes:
$ cd ros2_ws/
$ colcon build
Run your nodes
We can finally run both our client and server nodes to see if they can communicate with each other properly!
You will need two terminal windows – remember to source install/setup.bash in each one before running any ROS 2 command:
$ cd ros2_ws/
$ source install/setup.bash
The first terminal will contain the client diagnostics_node:
$ ros2 run srv_client_checks diagnostics_node
This node will wait for motor_node to appear before requesting the checks.
Next, run the server motor_node to execute the checks:
$ ros2 run srv_client_checks motor_node
When motor_node executes and the server activates, it performs its checks. In this case, a warning shows because we don't have any motors – there is no possible way for the checks to succeed!
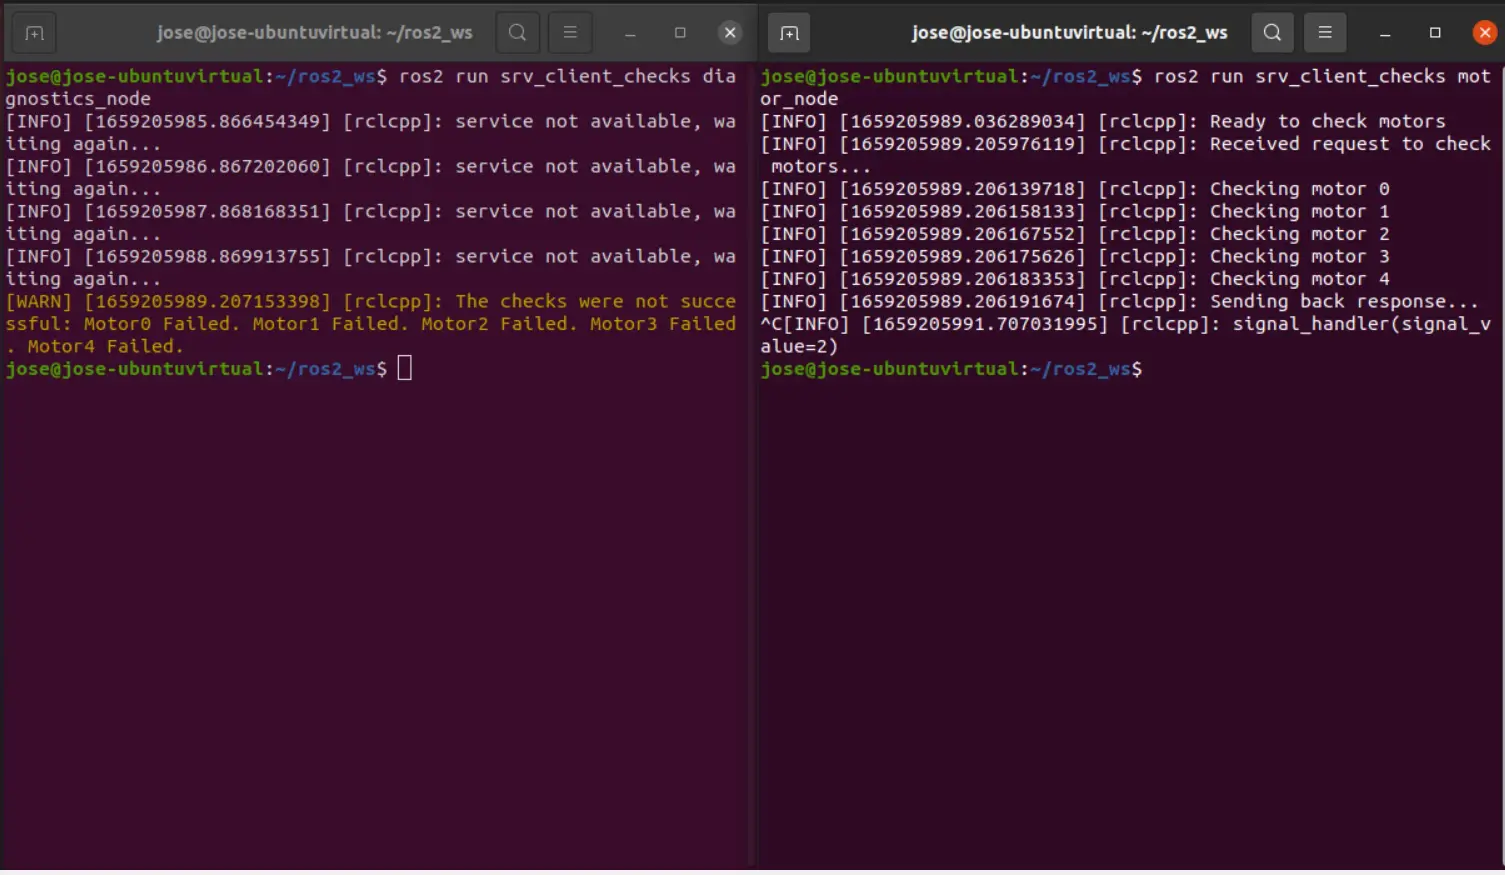 Left: Client
 diagnostics_node. Right: Server motor_node.
You've now created a server-client communication that checks your actuators and sensors during start-up, making sure that everything is working properly before continuing.
Continue playing around with running your nodes to see how they behave. For example, what would you expect to happen if you run the server node before the client?
Keep learning!
We hope you enjoyed this tutorial and now have a better understand of how you can use ROS 2 services in your own robotics project. Continue learning with our ROS tutorials and other articles on our blog.
As always, feel free to check our docs or reach out to us directly in our Slack community to learn how our tools can help you accelerate your ROS development!
Read more:
Coordinate open-ended communication between your ROS nodes
 Esther WeonEsther Weon
Share custom visualization tools with your teammates
Esther WeonEsther WeonGet blog posts sent directly to your inbox.